Voxengo Logo
On-line links: Products - Downloads - Purchase - Contacts - Forums
Voxengo Voxformer VST HELP

Voxengo Voxformer VST Screenshot


Contents

Introduction
Preset management
Mode buttons
Knob control
Equalizer
Parameters
Misc controls
Troubleshooting tips and additional information


Introduction

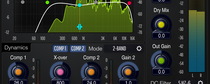
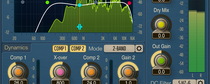
Voxformer is a multi-functional vocal channel strip plug-in in PC VST format. Combining several professional quality processing modules, Voxformer was designed to be a comprehensive solution for all your vocal processing needs - be it spoken or sung vocals.

The coolest feature of Voxformer is its one-knob vocal compressor. Using only a single knob, you can get a tight, open and definitive professional vocal sound in no time. You do not have to worry about common ratio, release, attack and make-up gain controls since they are automatically selected by the advanced compression algorithm. Moreover, Voxformer features two compressors of this type, allowing you to apply either a two-band or a two-stage (serial) vocal compression. For two-band compression Voxformer splits the audio signal into two spectral parts, by means of a switchable crossover filter.

Voxformer also features a de-esser with switchable center frequency and threshold. A noise gate is also available, which, in a manner similar to a compressor, was designed to bring ease of tuning while providing excellent sonic results. For those who like the saturated vocal sound, Voxformer implements a special saturation module which applies a smooth vintage saturation. Another useful thing Voxformer has to offer is the presence boosting module, which you can use to add some shine and space to the vocals.

To simplify the control over these processing modules, Voxformer implements residue listening, which allows you to hear what gets removed during de-essing and noise gate operation, and what is being added by the presence module.

As a finishing touch, Voxformer offers you a flexible 4-band equalizer (pre/post selectable) with a real-time output stage fast Fourier transform (FFT) spectrum analyzer display. Each equalizer band can be switched to a parametric, low-shelf, high-shelf, low-pass or high-pass filtering mode.

Voxengo Voxformer features:

  • Two built-in vocal compressors
  • Switchable crossover (2 types)
  • Gain reduction meters
  • 4-band equalizer
  • Real-time FFT spectrum analyzer
  • Asymmetric compression
  • Vintage saturation module
  • De-esser module (2 types)
  • Presence boosting module
  • Noise gate module
  • High quality mode
  • "A-to-B" comparisons
  • Mono-to-Stereo, Stereo-to-Stereo processing
  • Any sample rate is supported
  • Factory presets
  • 64-bit internal precision
  • Native assembler DSP code


  • Preset management

    Top buttons

    You can use the "Preset..." menu button to perform basic FXP/FXB preset/bank management tasks. The "Set as default" menu option of the "Presets..." menu allows you to assign the currently loaded program to the default preset program. This default program will be loaded whenever you enable a new instance of the plug-in or reset the current program. You can use the "Reset default" option to restore the default factory preset.

    By pressing the "A|B" button, you can exchange the current and shadow (or, alternatively, "A" and "B") programs. The "Copy" button copies the current program to a shadow one.

    Since only a single shadow program is used for the whole program bank, you can use "A|B" button to copy programs. To do so, you first need to switch to a program you want to copy and press the "Copy" button. Next, switch to a program where you want to put the first program and press the "A|B" button.

    The "Reset" button can be used to reset the current program. All parameters will return to their default states.


    Mode buttons

    Mode buttons

    The "Presence" selector adjusts the position of the presence module's input within the signal path. In the default "Post" mode, the presence module processes the signal after it passes the crossover, compressors and de-esser modules and then mixes in the result. In the "Pre" mode, the presence module takes the sound before it is passed to the crossover or compressor, processes it, but mixes it on the same stage as in the "Post" mode. In the "Pre" mode, the original signal's transients will be preserved and thus the effect of the presence module may sound brighter and more dynamic. Note that Presence tuned to lower frequencies will create an interesting low-frequency pad.

    The "EQ Mode Pre/Post/Off" switch changes the position of the equalizer in the signal path or disables it completely. A special "PrePost" option processes cut filters (low-pass and high-pass) in the "Pre" mode and other filter types in the "Post" mode.

    The "Asymm.C" (asymmetric compression) mode switch enables asymmetric compression. The value of this control affects the strength of the asymmetry. In asymmetric mode compression is less extreme than you can get otherwise. At the same time, asymmetric compression has its unique sound with a very strong `analog' feel to it. This mode is best used in serial compression mode (when the crossover is off). You may view this mode as an additional compression mode which delivers a different coloration. Also note that in single-band or two-band compression modes the asymmetric algorithm compresses one half of the waveform stronger than the other. In serial compression the first compressor compresses one half of the waveform while the second compressor compresses the other half.

    The "Listen Output" switch allows you to select which signal to listen to. The default "Wet" option enables full effect output. The "Dry" option enables bypass mode. "De-S Flt" option enables monitoring of the side-chain signal being fed to the de-esser.

    The "High/Normal Quality" button is used to switch between the normal and the high-quality processing modes. The high-quality processing mode internally uses a two-times higher sample rate, performing 2x oversampling. The high quality mode uses about two times more CPU resources. The "Auto" quality mode disables oversampling in the normal real-time plug-in operation and turns oversampling on during the offline audio bouncing. Please note that the "Auto" mode may not work properly in all hosts (if the host does not report back when it enters the offline processing mode).

    The "Force Mono" switch enables processing of the left channel only (when stereo material is being processed). This mode allows you to save 20-30% of CPU power in comparison to the full stereo operation. NOTE: Since the "Force Mono" mode is enabled by default, any pan envelope of the audio track where Voxformer is inserted may not work properly. To resolve this matter simply disable the "Force Mono" mode.

    The "Misc" button brings up the misc controls panel.


    Knob control

    Knob control

    To change a knob control's value, drag it with the left mouse button and move it up or down. For finer adjustment, press the right mouse button while dragging. Double-clicking on the knob with the left mouse button will return the knob to its default position.

    You may also use the mouse wheel to adjust a knob control's value. Before the mouse wheel begins to work you should click the plug-in's window in any area so that plug-in's window gains focus.


    Equalizer

    Equalizer

    On this picture you can see an equalizer control window with several control buttons, cursor position readout (in the top right corner) and a spectrum analyzer display curve (light green).

    The "Inv" (invert) button inverts the gains of the filters. The "Arrow Down" button can be used to attenuate the gains of the filters. The "Arrow Up" button amplifies the gains of the filters, doing the opposite of what the "Arrow Down" does. The "Rst" (reset) button resets filters to 0 dB and disables them.

    The "Spd" (speed) selector specifies the speed (averaging coefficient) of the spectrum analyzer. The slower the speed the more latent the spectrum analyzer is. The "Slope" selector (which is defined in dB per octave) allows you to adjust the spectrum analyzer display slope towards higher frequencies. This can be useful because higher frequencies are usually weaker than lower frequencies, and thus tuning them can be a difficult task. By choosing an appropriate slope setting, you can compensate for this behavior and make the spectrum plot more convenient and meaningful.

    This picture also shows control points which can be dragged with the left mouse button to adjust the filter's gain and frequency (you may additionally hold the SHIFT key to enable more precise movements). Double-clicking on a control point returns it to the 0 dB gain position. You can hold the CTRL key while dragging a point to enable its gain adjust only. Holding the ALT key while dragging a point adjusts its frequency only. A control point's position fully corresponds to the state of the filter in accordance with the color displayed on the bottom of the user interface.

    If several points are selected and you double-click any of the selected points, all selected points will be reset to 0 dB. While dragging a control point, you can adjust the filter's bandwidth by additionally holding the right mouse button. Alternatively, you can use the mouse wheel to adjust the bandwidth. By pressing the right mouse button, you can adjust the filter type.

    Pointing to a control point with the mouse cursor will cause it to be encircled with the green circle, and the corresponding filter's frequency response curve will become green. The orange curve on the picture above shows the summary frequency response of all currently enabled filters.

    You can also edit groups of control points by selecting them in a convenient manner. Just start dragging the control surface. In response to your dragging, a box will appear showing the selection area. All control points that enter this area become selected. Later you can move a group of selected points (encircled with a dashed line) like you are working with a single point. To add points to the current selection, you have to press the SHIFT key before starting to drag the control surface. To deselect the currently selected points, simply click the control surface anywhere.


    Parameters

    Comp A and Comp B parameters control the amount of compression of Compressor A and Compressor B, respectively. Please note that gain reduction meters show the amount of gain reduction in dB scale. The "Comp A" and "Comp B" knobs can be synchronized with the SHIFT and the ALT keys.

    XOvr specifies the crossover frequency between the spectral parts which get compressed by Compressor A and Compressor B. Please note that you can turn this parameter hard right to disable the crossover and to enable serial compression processing. A small button with the number printed on it selects crossover filter type. Type 1 offers you a considerably more 'boxy' sound with more 'old style' feel. Type 2 offers you a modern crossover filter with almost unnoticable coloration.

    Gain B controls the gain of the Compressor B.

    Saturate controls the strength of the saturation effect.

    Deess specifies the threshold of the de-essing compressor. This compressor always works in a side-chain mode. A small button with the number printed on it selects de-essing algorithm type. Center specifies the center frequency of the side-chain band-pass filter. You may view this de-esser as an ordinary compressor without the attack and release controls. Note that when the crossover filter along with Compressor B is active, the De-esser processes Compressor B's output before it is being mixed with the Compressor A's output. If the crossover filter is disabled, De-esser will work after Compressor A or after Compressor B if serial processing is active (crossover filter disabled). Also note that you can monitor the effect of the de-esser by selecting an appropriate "Listen Output" option.

    The Presence block of controls adjusts the presence effect's parameters. The presence parameter itself controls a Voxformer-type compressor which processes the output signal which has run through a band-pass filter with the center frequency defined by the Center parameter, and then adds the result (amplified by the Gain value) to the output.

    Gate parameter specifies the threshold of the noise gate module. It is suggested that you use an appropriate "Listen Output" option when tuning this parameter. You may also examine the gate parameter's meter, which shows the moments when the gate is opening. Please note that this meter has no specific scale.

    The In parameter adjusts the input gain. It is sometimes useful to adjust the input level if you are using a preset created for another signal level. This way you will not need to adjust all of the other plug-in parameters.

    The Out parameter controls the overall output signal gain.

    A label between the In and Out knobs shows the difference (in decibels) between the input and output signals. Positive values mean that the output signal is louder than the input signal. A special button near the Out knob label turns red when three sequential clip incidents were detected on any output channel. Click this button to reset it to its normal state.

    Please also note that on the output stage Voxformer utilizes a built-in DC filter which helps to avoid introduction of additional DC offset.


    Misc controls

    Misc controls

    DS Ratio adjust the ratio of the de-esser's compressor.

    DS b/w adjusts the bandwidth (inverse Q) of the built-in side-chain filter used in the de-esser.

    Prsnc b/w adjusts the bandwidth (inverse Q) of the presence module's filter.

    Sat Bias defines the internal bias of the saturation module. This parameter allows you to adjust the harmonic content generated by the saturation.


    ?

    Pressing this button will display the plug-in's info screen. This screen shows copyright and registration information, and contains the "Help" button, which opens the bundled HTML help file you are reading now. This screen also contains a signal flow diagram which you can examine to see how signal is routed within Voxformer.


    Troubleshooting tips and additional information.


    Does the saturate knob in Voxformer sound like Lampthruster, Warmifier, or something completely different?

    It is something completely different. Both Lampthruster and Warmifier give a very moderate amount of distortion to create some 'flavor' while saturation module of Voxformer distorts the waveform completely. So this saturation can be hardly useful on complete mixes while it may be a good treatment for a vocal or instrument track.


    Does this channel strip compress the high/low freq?

    Yes, Voxformer is able to compress the low and high frequencies separately.


    I don't understand the presence controls. What is the difference between the presence level and gain? Is the presence simply a bandpass eq centered on the "center" frequency?

    Presence uses bandpass-filtered signal, but then compresses it using the Presence level and then adds the result to the output according to the gain parameter.


    I don't quite understand what PrePost does. Could you clarify?

    In this mode all cut filters (Lo-pass and Hi-pass) are processed in the 'Pre' mode while other filters are processed in the 'Post' mode. This allows you to apply cut filters before compressing the signal and apply other filters after compression/saturation took place.


    Could you explain a bit about asymmetric compression? I've not run in to the term elsewhere.

    Asymmetric compression is the compression when the positive half of the signal is compressed differently than the negative half of the signal. Valve equipment works this way, for example. In the case of Voxformer you have an additional sound choice: you may use it if you like it. For indepth information please read the manual.


    I found a strange behaviour... Select the "Softer than Silk" preset, then switching quality change the EQ curve. Is it normal?

    Yes, it is normal. High quality mode uses two times higher sample rate. Digital filters have response deviations depending on the sample rate. The lower the frequency a filter is tuned to the less deviation there will be when you switch to another sample rate.


    I was checking if the Voxformer would be a good choice for the initial vocal limiting of the microphone input, and if so, what the best setting would be. I hope that makes sense, I'm looking for something fairly transparent that will help my vocals not to distort with dynamic vocalists.

    It should be said that such kind of limiting may not be performed with the plug-in as plug-in already receives signal which was probably clipped by your audiocard (this can't be done otherwise). You should use an outboard analog effects processor which can limit your vocal signal.


    Just Curious - does the saturate knob in Voxformer sound like Lampthruster, Warmifier, or something completely different?

    It is something completely different. Both Lampthruster and Warmifier give a very moderate amount of distortion to create some 'flavour' while saturation module of Voxformer distorts the waveform completely. So this saturation can be hardly useful on complete mixes while it may be a good treatment for a vocal or instrument track.


    I'm kind of bummed out about Voxformer being a mono channel only.

    Voxformer is a fully stereo-capable plug-in. Please disable the 'F.Mono' switch which is enabled by default. This way it will start working in full stereo.


    I know Voxformer is a vocal plugin but it seems there are people using it for other things. I would appreciate if anyone could suggest alternative uses for this plugin.

    This plug-in can be used for acoustic guitar and synth instruments as well.


    Voxformer EQ vs. GlissEQ. Are the two comparable? Would I need GlissEQ if I already have Voxformer?

    When EQ in GlissEQ is at Dyn 0 setting it is almost the same as Voxformer's EQ. Otherwise they are very different.


    Hello, when using the Default preset of Voxformer, I am able to drag the EQ controls around however there is no effect on the audio.

    You'll have to right-click on the EQ point to enable it. Right-clicking the point changes the EQ type that corresponds to that point.


    The signal I am feeding this plugin is not loud enough to register on the spectrum analyzer, I barely get it to show up, what can I do besides raising the input gain?

    Increasing the input gain (via the "In" control knob) is the only option in Voxformer. You may also use a higher spectrum 'Speed' option - this way averaging time will be smaller and the peaks drawn on the spectrum analyzer window will be higher.


    I noticed that holding the Alt key while adjusting the input gain, mirrors the setting on the other side, so that its opposite from the in gain, this should give the spectrum analyzer a better signal, without affecting the output volume, right?

    Yes, this is correct.


    Is the Presence module suitable for mastering? I've noticed that it gives very good results.

    I'm not sure it is suitable for mastering - it can be too strong and a bit uncontrollable for broadband signals.


    Would this plug-in be as usable as a normal channel strip?

    I cannot suggest Voxformer for usual intrack use, because it won't deliver enough control for all music sources. Voxformer is mainly usable for vocals and guitars. For everything else it may or may not be suitable - due to absence of attack/release controls, and general compression behavior.


    Special thanks go to Vitaly Zolotarev at Dawn Raid Studio, New Zealand, for ideas, testing and presets.


    Happy Mixing!


    Copyright © 2004-2008 Aleksey Vaneev

    VST is a trademark of Steinberg Media Technologies GmbH.
    All other trademarks belong to their respective owners.
    Plug-in uses PNG library by Gustavo Huffenbacher Daud