Voxengo Marquis Compressor
Primary User Guide (PDF): English, Français, Deutsch, Русский язык
Applications
- Audio track compressor
- Audio mastering compressor
- “Characterful” compressor
- Stereo, mono, mid-side compressor
- 7.1, 5.1 surround sound compressor
- Side-chain compressor
- Gate/downward expander
- De-esser
- Harmonic exciter/saturator
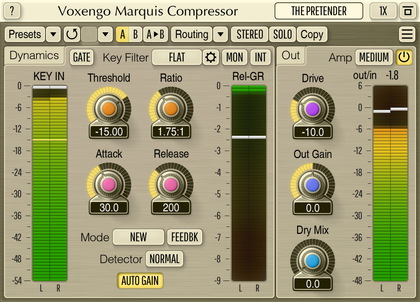
Marquis Compressor is a “universal” compressor AAX, AudioUnit, and VST plugin for professional sound and music production applications. You’ll find a very smooth compression performance in this compressor, coupled with a harmonically-rich sound, both suitable for mixing and mastering. Being “universal” this compressor can be used on a wide range of sound material: individual tracks, stems and mixes, producing “clean” or “colored” sound.
Marquis Compressor plugin was built around a tube triode-modeled amplifier cascade. At low Drive settings this cascade produces a mild harmonic coloration while at higher Drive settings you can get a brutal tube saturation which works great for drums, bass, and vocals. At moderate Drive settings this cascade can add a pleasant grit to the mix.
Marquis Compressor features a unique “round” signal level detection algorithm, which creates a very open, punchy, compressed, sound with an impressive transient response. Beside this, Marquis Compressor offers a classic feedback (opto) compression mode switchable to a more common feed-forward compression.
Marquis Compressor carries 3 distinctive compression algorithms, one of them (T3) being modeled after a classic analog compressor. The Gate algorithm is also available which is handy at reducing drum bleed in drum tracks.