Voxengo CurveEQ
Primary User Guide (PDF): English, Français, Deutsch, Русский язык
Applications
- Audio mastering equalizer
- Spectrum matching equalizer
- Stereo, mono, mid-side equalizer
- 7.1, 5.1 surround sound equalizer
- Transparent equalizer
- FFT spectrum analyzer (SPAN-like)
- Free-hand drawing equalizer
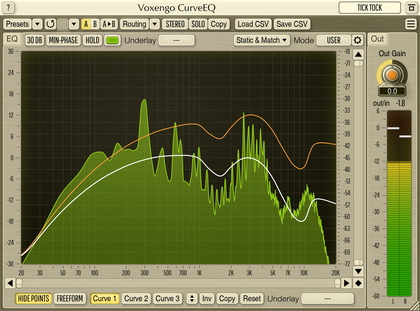
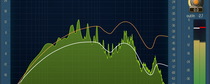
CurveEQ is a spline equalizer AAX, AudioUnit, and VST plugin for professional sound and music production applications. CurveEQ shows you the actual filter response you are designing by means of a spline (a smooth curvy line), plus it displays the output spectrum, so you can readily see what the EQ is doing with the sound. This, in turn, allows you to get the best from your mix and your tracks. CurveEQ perfectly suits the needs of mastering.
Additionally, CurveEQ implements spectrum matching technology that allows you to transfer spectrum’s shape of one recording to another. In other words, this allows you to “copy” frequency balance of existing time-proven mixes so that other mixes that are still in the works may have a chance to sound better. This technology also greatly helps in music mastering since it easily lessens any dramatic differences in the area of frequency balance between various tracks.
CurveEQ’s filters can be switched between linear- and minimum-phase modes. CurveEQ also features a deeply-customizable spectrum analyzer like the one found in Voxengo GlissEQ and SPAN plugins. You can also display, save, and load static spectrum plots for comparison and matching purposes.