Contents
Introduction
Top buttons
Bottom buttons
Knob control
Control points
Group editing of control points
Control surface navigation
General plug-in information
Tuning the noise reduction
Using the makeup equalizer
Tuning the attack and the release
Tuning the history parameter
Demo factory presets
Troubleshooting tips and additional information
Introduction
The latest plug-in Voxengo brings you is Redunoise. Redunoise is a
high resolution audio noise reduction system in PC VST plug-in format.
It delivers an unprecedented quality and offers the most comprehensive
control.
Potentially, every person dealing with audio recordings works with noisy
program material on several occasions. These situations tend to get painful
since existing broadband noise reduction processes can be very complicated,
because from the outset, results with them are not always pleasant. In a
search for a better solution, we have developed our successful Redunoise.
Broadband noise is basically a very simple entity. For example, in audio
editors, it is called `white noise', which you can generate for the given
duration. Cassette and vinyl recordings have plenty of it. Sometimes recording
to the line input of an audiocard also leaves a great deal of broadband noise,
especially after normalizing. With such noisy audio sources, the natural
desire is to reduce this broadband noise content while preserving all the
necessary musical components, which is the most important part of the noise
reduction process.
Redunoise uses advanced analysis and filtering approaches, offering
an unprecedented audio analysis resolution and musically-sounding noise
reduction filtering. Chances are you will like what Redunoise has to offer
in the field of broadband noise reduction.
We must say, however, that Redunoise achieves its performance using a great
deal of CPU resources. You should use at least a 1.3 GHz non-budget processor
along with a relatively high audiocard latency. The second drawback we must
stress is latency. Redunoise gives nearly 33,000 samples of latency. To lessen
the unfortunate side of such huge latency, we have implemented analysis
display time correction so that the actual audio playback is synced with the
picture you see on the display.
Voxengo Redunoise features:
High resolution spectrum analysis
Analog-prototyped filtering
Linear-phase filtering
Real-time spectrum display
Noise learn function
Residual output monitoring
Logarithmic/linear scale switch
Multilevel undo for each parameter
"A-to-B" comparisons
Mono-to-Stereo, Stereo-to-Stereo processing
Support of sample rates up to 96 kHz
Demo factory presets
64-bit internal precision
Native assembler DSP code

The "Copy to..." button allows you to copy the current envelope to
any other envelope.
The "Reset curve" button resets the current parameter curve. You can
undo the reset later.
The "Analyzer" button selects the analysis mode. Mode "A" gives an
increased analysis inertia as the frequency lowers, at the same time
offering an increased resolution. Mode "B" is an `inertia-less' mode, however
it gives a reduced analysis resolution. Sometimes mode "B" can help to improve
the reaction speed of the lower frequency end filtering, thus minimizing
the `pre-echo' effect.
The "Logarithmic/Linear" button allows you to choose the display
and parameter definition mode of Redunoise. This also affects the internal
parameter evaluation done by Redunoise.
The "Min/Lin-phase" switch allows you to select the type of
filtering Redunoise utilizes. Minimum-phase filtering is an analog-type
filtering which minimizes pre-echoing artifacts at the expense of
some introduced coloration. Linear-phase filtering is more neutral type of
filtering.
The "Noise Learn" button engages the noise learning process.
During noise learning, the spectrum analysis display shows the averaged
spectrum accumulated so far. This averaged spectrum will be used to build
the Threshold curve. A small button with a number printed on it selects
how many points the resulting Threshold curve should have. Press the
"Noise Learn" button after some learning time again to build this
curve. Please note that the Threshold curve is built only during the
audio processing. This means that this curve will not be created if the
plug-in is paused in the audio host.

A set of buttons below the control surface allows you to select which
parameter curve is currently being edited.

You can use the "Preset..." menu button to perform basic FXP/FXB
preset/bank management tasks. The "Set as default" menu option of
the "Presets..." menu allows you to assign the currently loaded program
to the default preset program. This default program will be loaded whenever
you enable a new instance of the plug-in or reset the current program. You can
use the "Reset default" option to restore the default factory
preset.
By pressing the "A|B" button, you can exchange the current and
shadow (or, alternatively, "A" and "B") programs.
The "Copy" button copies the current program to a shadow one.
Since only a single shadow program is used for the whole program bank, you
can use "A|B" button to copy programs. To do so, you first need to switch to
a program you want to copy and press the "Copy" button. Next, switch to a
program where you want to put the first program and press the "A|B"
button.
The "Reset" button can be used to reset the current program. All
parameters will return to their default states.
The button with the "In & Out" label selects which spectrums should
be displayed.
The "Residue" switch button enables monitoring of the residual
output. This mode is useful for evaluating the parts of the signal
which are being removed. You can also enable the Output spectrum display
to see the spectrum of the signal which is being removed.
The "Bypass" switch button allows you to bypass the noise reduction
filtering stage (including residual monitoring) for general adjustment
evaluation.
After every change of the parameter curve, with the help of the
"Un" (undo) and the "Re" (redo) buttons, you have an opportunity
to undo changes made. The parameter curve change starts when the left mouse
button is pressed and ends when the left mouse button is released. You can
also undo some operations like control point insertion and deletion.

To change a knob control's value, drag it with the left mouse button
and move it up or down. For finer adjustment, press the right mouse button
while dragging. Double-clicking on the knob with the left mouse button will
return a knob to its default position.
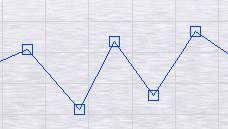
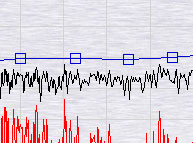
This picture shows the control points which can be dragged with the left
mouse button to adjust the current envelope. Double-clicking on a control
point removes it. The first and last points return to default vertical
position when double-clicked. To add a new control point, double-click
the control surface at the desired position.
If several points are selected and you double-click any of the
existing points, all selected points will be either deleted or reset.
Dragging the envelope line selects two points, adjacent to this line,
and enables you to move these points, vertically constrained.
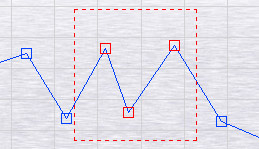
You can also edit groups of control points by selecting them in a very
convenient manner. Just hold down the left mouse button and
start dragging the control surface. In response to
your dragging, a box will appear showing the selection area. All control
points that enter this area become selected. You can then move a group of
selected points the way you would move a single point, vertically constrained.
To add points to the current selection, press the SHIFT key before
starting to drag the control surface. To deselect the currently selected
points, simply click the control surface anywhere.
You can press the right mouse button on the control surface to select all
control points.
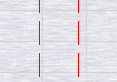
You can zoom in the control surface by first holding the ALT key and
then dragging the control surface. In response to this, you will see two
vertical red dashed lines specifying the zoom in area.
To fully zoom out, hold the ALT key and double-click the left mouse
button.
Please note that you can maximally zoom in to the area span of 90 Hz
(at 44.1 kHz), only.
While the control surface is zoomed, you have the opportunity to scroll the
visible control surface area. To scroll this area, hold the CTRL key
and drag the control surface, and then move the mouse to the left or to the
right.
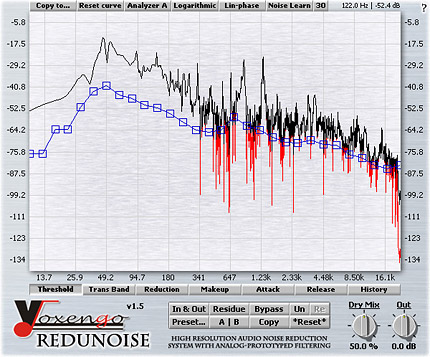
General plug-in information
First of all, you should understand the way Redunoise is controlled.
Redunoise has seven internal parameters that directly affect the noise
reduction process. Each parameter is defined by an arbitrary curve.
The horizontal axis is always an axis of frequencies. The vertical axis's
legend depends on the parameter.
These parameters are:
Threshold - this parameter defines the threshold level of the
noise reduction algorithm. This parameter specifies the center of the
transition band.
Trans Band - this is the Transition Band parameter. Any signal
staying within the transition band will be gradually attenuated, with the
maximum attenuation reached at the bottom of the transition band. If the
signal stays above the top of the transition band, it won't be attenuated at
all. Zero transition band means the signal will be attenuated right after
falling below the Threshold curve.
Reduction - this parameter specifies how strong the
attenuation is.
Makeup - this parameter allows you to adjust the output gain in the
desired parts of the frequency spectrum. This parameter resembles an
equalizer.
Attack, Release - these parameters control the inertia of
Redunoise's internal filters. E.g., with zero Attack and zero Release,
internal filters have no inertia, making filtering instant. With the help of
these parameters, you can get rid of any `sound swishes' which might suddenly
appear.
History - this parameter specifies the length of the history buffer
used. History = 1 means Redunoise analyser has no history on track and only
the instant spectrum is used for analysis. The history parameter naturally
affects filtering process's inertia.
All parameters except the History have dB readings. The History parameter
has no reading - it is a value internally recognisable by Redunoise.
Please note that the Threshold parameter curve is always
visible on the control surface. This helps to tune other parameters in
accordance with it.
Redunoise always works in a stereo-linked mode. This means that the
filtering it performs is applied in equal power to both the left and right
channels. This eliminates any stereo `waving' effects and preserves the
stereo field.
You may use the "Dry Mix" parameter to control the mix between the
de-noised and the original dry signal.
Tuning the noise reduction
This can be tricky at first. First of all, you have to understand what you
actually wish to filter out. Generally, what must be filtered out is a
broadband noise which often appears as a nearly-horizontal floor behaving in
a noisy pattern.
After understanding where the noise is present, you can start tuning the
Threshold parameter. It is suggested that you keep the threshold line slightly
above the actual noise floor.
To get good results, you have to examine the whole spectrum and search for
areas behaving like a noise. All such areas must be marked by means of
a Threshold parameter. The noise floor in the lower frequency areas is
generally higher than in higher frequency areas, so you should consider
compensating for this in your Threshold curve.
Immediately after tuning the Threshold curve, you have to set the
Transition Band curve. For simplicity's sake, you can make it a horizontal
line. The transition band is centered around the Threshold curve you have
defined. For signals that have a hardly-determinable noise floor, you can
use a wider transition band. This is especially useful for recovering vinyl
recordings. For digital or compact cassette-type recordings, the transition
band can be lower because the noise floor is more determinable there.
The next step is to tune the Reduction curve. Please note that the
Reduction curve is closely interconnected with the Threshold and the
Transition Band curves you have already defined. When both the Threshold and
the Transition Band curves are properly set, tuning the Reduction parameter
is an easy task, and you will immediately see its impact on the red reduction
plot which is drawn beneath the input spectrum analysis plot. Where the
Reduction parameter is stronger you will see a stronger noise reduction
applied.
Using the makeup equalizer
The next parameter you will possibly need to tune is the Makeup.
As already stated, this parameter resembles an equalizer with an arbitrary
equalization curve. By default, Makeup curve is centered at 0 dB making no
EQ adjustment.
After filtering, equalization can be useful because filtering of the
broadband noise gives an effect of loss of the higher frequencies. You can
amplify those parts of the spectrum which you think lack some power.
Tuning the attack and the release
The Attack parameter damps the speed of the noise reduction filters so that
when the analyser decides to lower the noisefloor, the decided reduction
magnitude is not achieved instantly. Such behavior allows you to get rid of
the very fast reduction changes, thus removing any `swishy sound'
artifacts.
You can increase the magnitude of the Attack parameter if you feel you
are getting smoothed out transients with some instruments. However, a
non-zero Attack contributes to the less overall reached reduction, so you may
need to adjust the Reduction parameter as you adjust the Attack.
The Release parameter works in the same manner as the Attack parameter.
The Release damps the speed of the noise reduction filters returning to the
`no reduction' state.
Tuning the history parameter
This is a pretty special parameter which controls the averaging time of
the spectrum. If the value is near 1, there will be no averaging performed,
and the analyser will use the instant spectrum. This can be useful at times,
however, this also increases the chance of `swishy sound' appearance.
Higher values increase the averaging time, making the spectrum updating
smoother. Most of the time this allows you to stop `swishes' from appearing,
but at the cost of the lesser time precision. E.g., the analyser can react
slower than necessary if the history is set to a high value.
Also note that with small History values, it can be naturally beneficial
to increase the transition band, since in this case, the spectrum has a
larger span of the spectral values, especially in the areas with noise.
Demo factory presets
Redunoise is bundled with three demo factory preset programs from which
you can learn some basic things. These presets are: "Demo Cello", "Demo Gong"
and "Demo Orchestra". They correspond to the non-denoised demo MP3 files
available for download at the
Redunoise web page. Please
note that these demos are the worst cases one can get for denoising. At the
same time this is a good demonstration of Redunoise's noise reduction
capabilities.
Simply download the MP3 file, open it in your sound editor, then open the
Redunoise plug-in and load the corresponding preset. You will see how
the parameters were defined and how they affect the noise reduction
process.

Pressing this button will display the plug-in's info screen. This screen
shows copyright and registration information, and contains a "Help" button
which opens the bundled HTML help file you are reading now. This screen
also contains a "Preset..." menu button which you can use to perform basic
FXP/FXB preset/bank management tasks.
Now, several troubleshooting tips and additional
information.
Why do I get pops, clicks and glitches when using Redunoise?
Redunoise uses a large processing block size (1024 samples) which is first
accumulated, then processed. If your audiocard latency was set to a value less
than 1024 samples (e.g. 256 samples) Redunoise will generate CPU usage bursts
every 4 blocks (for 256 samples audiocard latency). If your computer is not
fast enough, you can experience pops and glitches in audio playback. You can
solve this problem by increasing audiocard latency to 1024 samples or more, or
upgrading your computer.
Please note that you should also increase your audiocard's latency if
Redunoise shows more than 50% CPU usage on your computer. This can help to get
rid of the occasional pops and clicks.
Can I use presets/programs created at 44.1kHz with 48kHz
material?
This is not possible. You have to readjust the parameters you have assigned
at 44.1kHz if you want them run seamlessly with another sample rate.
I don't even know how to begin. How do you begin when you
open a wave file? What is you very first step?
After you have opened your wave file you need to insert Redunoise to
the master section slot. After this you may open its user interface
and press playback start. You should see the real-time analysis
display. You may then move the threshold envelope down by dragging the
blue line segment (its on top by default). Then switch to the
reduction envelope and move it up a bit (its on the bottom by default
denoting no reduction should take place). If everything is OK, you
should see the red underlying spectrum which shows how strong the noise
reduction is. After this step you may start customizing threshold and
reduction envelopes further. You may start adjusting other envelopes
after you get some experience.
I am working with Canopus Edition Video editor and try to repair a
couple of audio files. I use the Redunoise VST plug, it works fine but there
is a big problem. The audio part is delayed quite a bit from the video part.
The sound is perfect but delayed about 1 or 2 seconds. What to do?
You are getting such delay because Redunoise induces it in the course of
processing. Most modern hosts compensate this delay. It seems that the program
you are using does not. Probably the only solution here is to process the file
and shift it back. At 44.1kHz the delay of Redunoise is 0.749 sec; at 48.0kHz
the delay is 0.688 sec.
For some reason, I notice an incredible noise reduction during fx
preview in Sound Forge. Then when I render it to track, most of the noise
exists still...what am I doing wrong?
That is a known issue: SoundForge by some reason does not reread the preset
and uses the one it stored previously. To resolve this you should touch the
Out or the Mix knob back and forth. I know that sounds like a funny solution,
but there is no other workaround currently available - unless you can ask
SoundForge's staff to fix this.
When I set the 'Trans Band' envelope am I actually setting the width of
the transition zone? In other words (looking at the spectrum - from the top down
in dB): Above Transition Band (no reduction above this point); Top of
Transition Band (begin gradual attenation for signal falling below this
point); Middle of Transition Band (point where Threshold is set, medium
attenuation); Bottom of Transition Band (maximal attenuation). So if I have a
Threshold (flat for simplicity - in actual use it will usually be the shape of
the noise spectrum at the noise floor) at -40dB and a Trans Band at 10.4dB
then the center of the Transition Band is at -40dB, the top is at -34.8dB and
the bottom is at -45.2dB.
Yes, this is correct.
How the History envelope works?
History parameter allows you to get a smoother overall spectrum Redunoise
uses during threshold analysis. So, for small History values it is useful to
set wide Trans Band values. Also note that large History values can give some
kind of EQ 'smearing' which results in some parts of the signal being reduced
for a longer time (this, in turn, eliminates possible swishes).
Is it possible to reduce the CPU load (like Pristine Space does with the
quality switch) so you can tweak the settings and then render the file at
maximum quality?
Right now I think it is impossible to introduce any kind of optimization.
So I guess upgrading your computer is the only way to get around this
issue.
Would it ever be possible to reduce the amount of latency Redunoise
introduces?
Unfortunately, no. It is possible to implement a fully 'analog'
noise-reduction plug-in with an equal sonic performance, but it will be a
total CPU hog in comparison to Redunoise.
I have been using R8Brain Pro to upsample files prior to processing in
order to avoid aliased artifacts. I was wondering if there is a similar
advantage to upsampling prior to using Redunoise for noise reduction.
In other words, are there artifacts from noise reduction that could be
aliased? Or is it better to use noise reduction on the 24/44 file and then
upsample for further processing?
There should be no advantage in denoising an upsampled file. Actually, due
to Redunoise's design, resolution in lower (most important) frequencies is
generally better if sample rate is lower. So, indeed, it is better to use
noise reduction on a lower sample rate file and then upsample it to perform
any further processing.
I seem to get a maximum of 100 points or so on a graph. Is there any
way to increase that?
I do not think there is any real sense in having more than 100 points -
this won't add any sonic quality nor precision. That is why I have not
implemented support for more points (96 is the limit).
It seems that I cannot noise profile 0.5 second noise sample.
This kind of limitation is imposed by the fact that Redunoise works at
a very high resolution in the lower frequencies - it requires at least
1 second noise sample with 10 seconds being a more stable estimate. Of
course, you may use 5 seconds or smaller sample as well. When noise
sample is very short Redunoise just can't "catch" enough information.
Usually it is not necessary to use noise profiling - it is only
necessary when noise pattern is very complex. When it is linear
broadband noise, it is much easier to setup Threshold envelope by
hand. Redunoise was designed in such a way so that exact Threshold
envelope is not needed - it uses Trans Band envelope to dampen
deviations of the Threshold envelope from the actual noise line.
Redunoise loads but has mysteriously stopped working. In Sonar 6PE it
has no functionality, in Soundforge the preview loops for only a split
second.
Maybe this has something to do with audiocard latency? Redunoise requires
a lot of CPU resources, and has a high latency. This usually creates a bit of
CPU load burst because audio hosts usually pre-buffer this latency so that you
do not have to wait.
Is the threshold envelope supposed to mark the entire spectrum, or no?
In the manual, it seems implied that only the parts of the spectrum "behaving
in a noisy pattern" are to be marked (by the way, what constitutes a noisy
pattern?). However, the Noise Learn function seems to mark the entire
spectrum, implying that reduction will be applied to the entire spectrum.
This isn't what I want, is it? How do I determine what to mark with the
threshold and what not?
Threshold envelope should not usually be above the spectrum - it should be
below, but of course it should be defined for the entire spectrum - in some
parts higher, in some parts lower. Noise learn function acquires an average
picture of the spectrum, so this function should only be used on noise part
without any signal. If used so, it usually creates a good threshold envelope.
Noise learn does not 'sample' the noise and then magically subtracts the
noise - it only helps to get the threshold envelope.
What does the Transband envelope really do? The Q-A section on this in
the manual is just over my head, I am sorry to say. Also, I'm not sure how to
center the transband "around" the threshold curve. How do you center a line
"around" a curve? And what does the transband envelope actually mark? The
center of the band, or the top?
Transband is a transition band - it specifies offset above and below the
threshold envelope where noise reduction occurs. So, signal of power above
( threshold + transband / 2 ) is not affected. Signal of power below
( threshold - transband / 2 ) is affected maximally.
I would like to add Redunoise to the chain that includes CurveEQ,
Soniformer, Elephant and Wizoo Reverb. Where would you insert
Redunoise?
I think it is more convenient to use Redunoise alone - it has got a large
latency, and so using other plug-ins together with Redunoise may reduce time
of response of these plug-ins.
Happy Cleaning!