Introduction
Transmodder is a transient-driven filtering system in PC VST plug-in
format. Transmodder could also be called a transient modification system,
since it allows the user to modify the audio material by means of dynamic
filtering--in accordance with the transient content of the signal--delivering
spectacular sonic pronunciation and definition.
The core element of Transmodder is the transient analyzer which processes
narrow- or broad-band signals and detects all rising-level transients such
as snare drum, bass drum, high hat hits, vocal sibilants and other types of
transients. In the course of detection, the transient analyzer generates an
envelope signal which replicates the transient structure of the signal being
analyzed. This also includes the detection of differences between sharp and
soft transients, which generate high and low envelope levels,
respectively.
Transmodder features five dynamic filters. Each can be controlled by
envelope signals generated by up to two transient analyzers. The good thing
about the filters used in Transmodder is that they work in a bypass mode when
the envelope stays at zero, causing no coloration to take place. This is
especially useful in mastering applications where processing transparency is
usually desirable.
The most evident purpose of this plug-in is to make the bass and high
frequency content stand out in the mix or make it less noticable. This effect
is very different from what a compressor/expander does because Transmodder
'sees' transients only. So, if there is a cymbal sound, only its very
beginning will be 'seen' by Transmodder: the cymbal sound's body will be left
unchanged. Moreover, transient detection does not depend on the absolute
incoming sound level, which is why in Transmodder there is no such parameter
as 'processing threshold'.
Transmodder is a useful mastering-stage plug-in. Since it is not extremely
CPU consumptive, it can be used in track insert slots, too. Transmodder can
work extremely well with drums, guitars and bass. One of the most remarkable
thing in this 'transient' processing is, in most cases, it adds punch and
brightness without severely affecting the overall perceived frequency
balance.
Transmodder features:
Four transient analyzers
Five dynamic filters
Real-time spectrum analyzer
Transient detection meters
Mid/side channel processing
Narrow band sweeping
High quality mode
Factory presets
"A-to-B" comparisons
Mono-to-Stereo, Stereo-to-Stereo processing
All sample rates supported
64-bit internal precision
Native assembler DSP code
Preset management

You can use the "Preset..." menu button to perform basic FXP/FXB
preset/bank management tasks. The "Set as default" menu option of
the "Presets..." menu allows you to assign the currently loaded program
to the default preset program. This default program will be loaded whenever
you enable a new instance of the plug-in or reset the current program. You can
use the "Reset default" option to restore the default factory
preset.
By pressing the "A|B" button, you can exchange the current and
shadow (or, alternatively, "A" and "B") programs.
The "Copy" button copies the current program to a shadow one.
Since only a single shadow program is used for the whole program bank, you
can use "A|B" button to copy programs. To do so, you first need to switch to
a program you want to copy and press the "Copy" button. Next, switch to a
program where you want to put the first program and press the "A|B"
button.
The "Reset" button can be used to reset the current program. All
parameters will return to their default states.
Transient analyzer
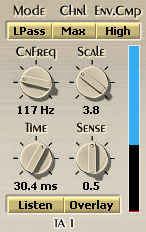
In this picture you can see knobs and switches which adjust the transient
analyzer's behavior.
In short, the transient analyzer detect transients in the given spectral
range and generates an envelope signal in the absolute range 0 to 1 (this is
visible on the meter: full blue is 1, full black is 0). This envelope can then
be connected to the filter's gain setting. E.g., when the envelope is at 1,
the filter runs at its specified Range setting. When the envelope is at 0, the
filter makes no adjustments to the signal. If the envelope is at 0.5, the
filter will use half its Range setting, etc.
Mode switch disables the analyzer or selects the frequency band this
analyzer should process. Broad means broad-band processing. Please note
that broad-band processing may not sound precise, and in some cases may even
generate unpleasant artifacts. BPass means single band processing,
in which only a given spectral band is being analyzed. This mode is the most
precise and most useful one: with its help, it is possible to precisely detect
transients in particular spectral parts (The BPass2 and BPass3 modes are
"wider" versions of the BPass mode). LPass - lower part of the
spectrum, HPass - higher part of the spectrum.
CnFreq parameter adjusts the center frequency for low-, high- and
band-pass filters.
Chnl switch selects which actual or derivative signal channel should
be analyzed. Max - analyzer processes the maximum of the two stereo
channels. Avg - average of the two stereo channels is processed.
Mid - middle signal of the stereo pair is used. Side - side
signal of the stereo pair is used. Please note that the side channel for
a mono signal is zero.
Env.Cmp (envelope compression) switch selects the envelope
compression strength. As mentioned in the introduction, the analyzer generates
envelopes of varying levels depending on the original transient power.
Envelope compression allows compression of the detected levels to reduce the
absolute level difference in the envelope signal. Such compression can be used
to reduce or increase the swing of the dynamic filters.
Scale parameter scales the envelope signal (and saturates it so that
it never exceeds 1). The Scale parameter is useful in making transients more
apparent.
Time adjusts the minimal interval between the transients. For higher
frequencies, the time should be smaller, for lower frequencies it should be
higher. Otherwise, transient detection may become smeared and may generate
'warbling' artifacts.
Sense parameter adjusts the sensitivity of the analyzer: e.g. when
the sensitivity is higher, the analyzer will detect almost all level changes.
When the sensitivity is low, only high-power 'stable' transients will be
detected.
Listen switch can be enabled to monitor the signal the analyzer
processes.
Overlay switch can be enabled to overlay the envelope signal on the
original signal. The envelope signal is translated into a 440 Hz sine wave. Please
note that you can tune the peak power of the sine wave on the help screen.
You can use the following tuning sequence:
Choose an appropriate Mode and CnFreq. BPass mode is
appropriate for most situations.
Choose a Chnl (Channel) the analyzer should process.
Depending on the CnFreq, an appropriate Time parameter should be
used. The Overlay switch can be engaged on this step: if you hear a
'buzzy' sound, then the Time should be increased.
Sense should be set up. Actually, it is better to tune Time
and Sense controls together.
As a final step, both the Env.Cmp and Scale parameters
should be selected. For higher Env.Cmp values, Scale can be left minimal.
For lower Env.Cmp values, Scale can be increased.
Tuning the filters is a much easier task and should be done after the
analyzer is set up. As a final step, the Scale parameter of the analyzer can
be additionally fine-tuned.
NOTE: If tuning the analyzer is a hard task for
you, then simply engage the global "Auto" mode. This mode is less
precise but it can provide some usable settings quicker.
Dynamic filter
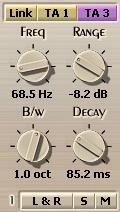
This is a dynamic filter's control panel. The top-left knob controls the
filter's frequency. The bottom-left knob controls the filter's bandwidth.
Range is the maximum gain a filter can reach when the transient is
detected.
Two "TA" selectors above allow you to attach transient envelopes
of up to two analyzers to this dynamic filter. The transient envelope controls
a filter's gain setting. Enable the Link switch to link the CnFreq
parameter of the analyzer to a filter's frequency setting. This way you can
modify the analyzer's frequency in sync to the filter's frequency
adjustments.
You may use the +1 option in any TA selector to feed the filter with
a constant +1 envelope signal: this means filter will be running at full power
all the time. Please note this option overrides second TA selection - so there
is no meaning in selecting an actual transient analyzer together with the +1
option.
The Decay parameter adjusts the decay time of the filter. Since
in most cases, the transient envelope generates very short transient 'bursts,'
it can be desirable to prolong their effect on the filter.
The button with the "L & R" label printed on it selects the audio
channel this filter is applied to.
The "S" switch enables the "solo" mode for the designated filter.
The "M" switch mutes the filter. Please note that soloing does not work
in the same way as in the multi-band processing plug-ins. I.e., you would not
hear a band-pass filtering effect.
Graphical display
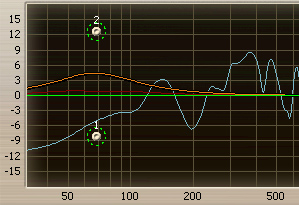
This is the part of the graphical display screen which can be seen by
pressing the Graph button. This screen helps a lot in both finding the
appropriate frequencies for the analyzer and tuning the filters, since
it features a real-time FFT spectrum analyzer (shown in light blue).
The "Block" selector specifies the block size of the spectrum
analyzer. The larger the block size, the larger the resolution in the lower
frequency range, but the lower the time coherence in the higher frequency end.
The "Speed" selector specifies the speed (averaging coefficient) of
the spectrum analyzer. The slower the speed, the higher the latency of the
spectrum analyzer. The "Slope" selector (which is defined in dB per
octave) allows you to adjust the spectrum analyzer display slope towards
higher frequencies. This can be useful because higher frequencies are usually
weaker than lower frequencies, and thus tuning them can be a difficult task.
By choosing an appropriate slope setting, you can compensate for this behavior
and make the spectrum plot more convenient and meaningful.
This picture also shows control points, which can be dragged with the left
mouse button to adjust the dynamic filter's Range and Frequency (you may
additionally hold the SHIFT key to enable more precise movements).
Double-clicking on a control point returns it to the 0 dB Range position.
You can hold the CTRL key while dragging a point to enable its Range
adjust only. Holding the ALT key while dragging a point adjusts its
frequency only. A control point's position fully corresponds to the state of
the dynamic filter in accordance with the number displayed on it.
If several points are selected and you double-click any of the
selected points, all selected points will be reset to 0 dB. While dragging a
control point, you can adjust the filter's bandwidth by additionally holding
the right mouse button.
Pointing to a control point with the mouse cursor will cause it to be
encircled with the green circle, and the corresponding filter's frequency
response curve will become green. The orange curve on the picture above shows
the summary frequency response of all active filters. The curve shown in dark
red is an estimation of the effective frequency response all filters
have for the moment.
You can also edit groups of control points by selecting them. Just start
dragging the control surface. In response to your dragging, a box will appear
showing the selection area. All control points that enter this area become
selected. Later you can move a group of selected points (encircled with a
dashed line) like you are working with a single point. To add points to the
current selection, you have to press the SHIFT key before starting to
drag the control surface. To deselect the currently selected points, simply
click the control surface anywhere.
On the graphical screen you may also see vertical lines of varying colors.
Horizontal position and color of these lines correspond to the CnFreq
parameter of the according transient analyzer. You may move these lines to
adjust CnFreq parameters of transient analyzers.
You can engage the Narrow band sweeping function by clicking the
left mouse button on the control surface while holding the CTRL key. This
function allows you to listen in a sweepable manner to a selectable narrow
band in order to detect various sonic artifacts.
A transient can be described as a quick volume change (bass drum,
high hat). If the volume stays constant (like a synth pad or bass sustain),
no transients can be detected. There are two types of transients: rising- and
falling-level transients. Transmodder detects rising-level transients
only.
Transmodder should not be generally used as a de-esser. However, it can be
successfully used as a treble smoothing process.
Transient analyzers do no change the sound - they only "catch" the
transients. These transients can then be used to drive any of
these 5 filters.
Peaks are detected regardless of the absolute signal volume: what is
important is the instantaneous level difference (the "Sense" parameter affects
the level difference sensitivity) in the given time-frame (specified by the
Time parameter). Then the "Scale" parameter scales (amplifies) the resulting
transient envelope.
Since Transmodder's transient analyzer is indifferent to the signal level
it may detect something if it's only a dithering noise.
What you hear in the Listen mode depends on the Mode of the transient
analyzer. BPass is steep (Q 1.70), BPass2 is less steep, BPass3 is two times
less steep as BPass.
In some cases, transient-shaping plug-ins can reshape attack, sustain and
release stages of the sound, but this is probably out of the reach of
Transmodder. In the case of Transmodder, transient moments can only be
amplified or attenuated. However, it is possible to perform advanced
tricks by using two filters together (one with the negative and the other
with the positive gain, and varying decays). Both filters should be driven
by the same transient analyzer. Although such approaches may look complex,
they can give further control over transients.
Indeed, it is a pretty 'complex' plug-in. Not that it is scientifically
complex, but you would need to understand sonic spectrum and dynamics concepts
to be able to tune it precisely.
The next step is to tune the filters. The logic is simple: if a transient
exists, make some part of the spectrum stronger according to it, or maybe
weaker--depending on your preference. This allows you to amplify bass, bass
drum or high hat hits. Some mixes may have too 'sharply' outstanding high hats
or vocal syllables - you can tune the filter to reduce them, thus making
the whole mix sound much smoother. It is also possible to do spectral
demasking this way - e.g., make the 1 kHz range lower in volume when high-
or low-frequency transients are detected.
It is also a good idea to check out the factory presets for some quick
treatment examples.
Envelope compression allows you to compress detector's dynamics. This way
you can apply equally-powerful filter adjustments to transients of
varying intensity.
Peaks are detected irregardless of the absolute signal volume: what is most
important is the level difference. Large Sense values allow Transmodder to
detect small level differences (e.g. 0.5 dB) while smaller values force it to
detect strong level differences (like 3 dB) in the given timeframe (specified
by the Time parameter). (These 'dB' figures are only comparative examples - in
action, the actual figures can be different).
Transmodder is not of this type for sure, but it can be configured to
'enhance' the higher frequencies.


