Contents
Introduction
What is impulse response?
General plug-in information
Program management buttons
Slot selector
File selector
Knob control
Convolution channels
Main controls
Impulse response controls
Envelopes
Envelope: control points
Envelope: group editing of control points
Envelope: zooming
Global settings
"Latency +512" global setting
Search paths
Factory presets information
Troubleshooting tips and additional information
Introduction
These days we are witnessing a true renaissance of convolution
reverbs. Processing power of personal computers has grown to the level
where a convolution reverb plug-in running on a digital audio workstation
(DAW) is no longer causing severe CPU overloads and audio dropouts. That is
why many companies working in the field of pro audio solutions started to
offer various products based on convolution processing.
Voxengo also offers its own convolution processing product. Pristine
Space is a native PC VST plug-in which allows you to use convolution reverb
impulses in your audio projects.
Pristine Space was mainly created for impulse reverb perfectionists:
it does not implement various `combo' approaches which try to save CPU cycles
by creating a synthetic reverb tail instead of performing a full convolution.
Because such approaches in many cases give unsatisfactory results if you
expect them to sound exactly like your original reverb impulse sounds, we have
decided not to use them. Instead, we have optimized to the maximum both the
efficiency of convolution processing and the plug-in's latency.
Pristine Space is a 8-channel convolution processor. Each channel is
independent of the others, making it possible to use Pristine Space in various
surround configurations. It also allows the user to apply a `true stereo' kind
of processing, where each stereo channel uses its own reverb impulse
(requiring 4 convolution channels in total). Sound designers and the like may
find Pristine Space's serial convolution processing feature (which allows one
to process the sound with several impulses in sequence) useful.
While Pristine Space does not offer various radical impulse transformation
features, it still offers several very useful envelope-driven non-destructive
impulse editing options, including volume, stereo width, stereo pan,
low-pass and high-pass filtering, and a linear-phase equalization. You can
also reverse, cut and time offset the loaded impulse file with ease,
non-destructively.
By the way, Pristine Space can work with a latency as low as 64 samples
(1.5 ms at 44.1kHz), making it possible to use it during tracking.
Pristine Space features:
Up to 8 convolution channels
Loading of up to 8 impulse files
Non-destructive impulse editing
Linear-phase impulse equalizer
Several latency options
Comprehensive routing
Serial convolution processing
WAV and AIFF format support
Multi-channel file support
Built-in sample rate converter
True zero-latency processing
Search paths mechanism
Factory presets
"A-to-B" comparisons
Support of all output sample rates
Low quality mode for CPU cycles saving
High convolution precision
SSE/SSE2 and 3DNow! optimizations
What is impulse response?
For the quick and general explanation which also applies to reverb
impulse responses, please follow
this link. In the context of Pristine Space, impulse
response is a standard mono, stereo or multi-channel uncompressed WAV
or AIFF file of any bit-depth.
The actual source of the impulse response can be anything you can think of:
a real room, a hardware reverb, an outboard delay effects processor, software
reverb, modeling software, etc. In fact, you can use absolutely *any* sound
(drums, claps, etc): this way you can get some interesting filter,
reverb and delay effects.
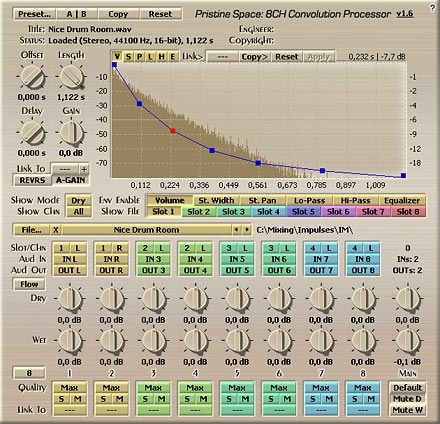
General plug-in information
The user interface of Pristine Space is divided into two major parts:
a) the part below the "File..." button resembling a set of controls for
8 convolution channels and a set of main controls; b) the part above the
"File..." button, including this button. This latter part consists of the file
slot selector, the file selector, the envelope display and a set of impulse
file adjustment controls with several knobs (e.g. "Delay", "Gain") and two
switches ("REVRS", "A-GAIN"). Above the envelope display, you can see the
information about the loaded impulse file: its title, copyright and the name
of the engineer who created this impulse file. Please note the
"Status" label: there you can see the status of the loaded file. In the case
of an impulse loading error, you will be able to see what kind of error
occurred.
Pristine Space is a 8-channel convolution plug-in with extensive
routing capabilities. You can process any input channel with any loaded
impulse response file and route the result into any of the output channels.
Convolution channels themselves can be inputs to other convolution channels
making serial convolution processing possible.
A general sequence of steps you should perform to get Pristine Space
working is:
Download or create an impulse response
Enable the Pristine Space plug-in in your audio host
Select the file slot
Press the "File..." button and specify the location of the impulse
response to be loaded
Assign the selected slot and the loaded file's channels to the desired
convolution channels
Check the Aud In and Aud Out routing
Modify the Dry and Wet gain values (e.g., send configurations
need the Dry gain to be at -inf dB)
Additionally, modify the Main Dry and Wet controls
Alternatively, you can use one of the template factory presets or use
the default preset to simplify the process of configuring the routing.
Please note that Pristine Space will automatically resample the loaded
impulse if its sample-rate differs from the host output sample-rate. However,
please note that resampling requires additional impulse loading time. For best
results it is suggested that impulse response files be resampled with a
dedicated sample rate conversion utility. Note that if sample rate
conversion took place an asterisk will appear next to the sample rate number
on the Status line.
Pristine Space supports wave files of any length. Be cautious when
loading very large files because this can quickly overload the CPU.
Program management buttons

You can use the "Preset..." menu button to perform basic FXP/FXB
preset/bank management tasks. The "Set as default" menu option of
the "Presets..." menu allows you to assign the currently loaded program
to the default preset program. This default program will be loaded whenever
you enable a new instance of the plug-in or reset the current program. You can
use the "Reset default" option to restore the default factory
preset.
By pressing the "A|B" button, you can exchange the current and
shadow (or, alternatively, "A" and "B") programs.
The "Copy" button copies the current program to a shadow one.
Since only a single shadow program is used for the whole program bank, you
can use "A|B" button to copy programs. To do so, you first need to switch to
a program you want to copy and press the "Copy" button. Next, switch to a
program where you want to put the first program and press the "A|B"
button.
The "Reset" button can be used to reset the current program. All
parameters will return to their default states.
Slot selector

This is the file slot selector coupled with the envelope enable switch
array. All slots have different colors which are used for `color-coding'.
Buttons associated with a convolution channel will have the same color as the
file slot this convolution channel uses. The same applies to the file selector
controls. Their color reflects the currently selected slot.
The envelope enable switch array reflects the enabled/disabled state of
the envelope of the currently selected slot. In order to edit or modify the
loaded impulse response file, an envelope must be enabled. Note that the edits
made by the envelopes are non-destructive since they don't make any actual
changes to the impulse response file itself.
You may additionally select which impulse response channel is displayed
by using the "Show Chn" selector.
"Show Mode" selector specifies which stage of the impulse response should
be shown - unaffected ("Dry") or affected ("Wet") by the envelopes.
File selector

Right in the center you can find the file selector controls. You can use
these controls to load the desired impulse response for the currently selected
file slot.
The "File..." button allows you to select any WAV file located on
your harddisk.
The "X" button unloads any currently loaded file.
You can use the left arrow and the right arrow buttons to quickly scroll
through the file list.

The long button with the file name of the loaded impulse printed on it
is actually a selector button. You can hold it to quick-select any file from
the same folder where the currently loaded file is located.
Knob control

To change a knob control's value, drag it with the left mouse button
and move it up or down. For finer adjustment, press the right mouse button
while dragging. Double-clicking on the knob with the left mouse button will
return the knob to its default position.
Convolution channels
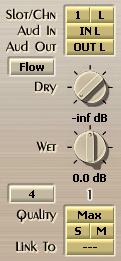
On this picture you can see the controls of the convolution channel 1.
All convolution channels are equal in functionality.
The "Flow" button displays convolution channel's signal flow
diagram. Press this button again to hide the diagram.
The button on the right, with "4" printed on it, selects the number of
enabled convolution channels. All disabled channels become `transparent' and
thus cannot be used or adjusted.
Coupled "Slot/Chn" selectors are used to tell which impulse response
file slot this convolution channel should use. Since the loaded impulse
response file can be either a mono, a stereo or a multi-channel file, you
have the option of choosing which impulse response file's channel (Chn)
you wish to assign to this convolution channel. If the selected file channel
is not available, the highest one which is actually available will be used. If
the selected file slot has no impulse file loaded in it, the convolution
channel will work in a bypass mode, with the wet signal output disabled.
NOTE: Each convolution channel is able to use
only a SINGLE channel from any impulse response slot meaning that if the
impulse file you have loaded has more than one channel you should utilize more
than one convolution channel also.
The "Aud In" selector specifies which audio input channel (host's
IN channel) is used by this convolution channel as an input (this audio
channel will be also fed to the output directly, multiplied by the Dry
parameter value). You can select "---" to disable processing of this
convolution channel. You can also specify any of the previous convolution
channels (CONV) as an input.
NOTE: Serial convolution processing does not allow a
host to compensate for additional processing delay imposed by serial
processing. It is suggested that you use serial processing with lower plug-in
latencies only.
The "Aud Out" selector specifies which audio output channel (host's
OUT channel) the convolution result is routed to. Please note that "---" state
does not disable the actual processing of the convolution channel (given the
other parameters allow it).
The "Dry" and the "Wet" knobs allow you to control the
balance between the dry and the wet signal on the output stage. Please note
if the "Aud Out" is equal to "---", these knobs will be shadowed.
The "Quality" switch selects the quality mode of the convolution
channel. The "Low" quality is usually 1.5 to 2 times more efficient. It can
be pretty useful during tracking and mixing. However, it is suggested to
enable the "Max" quality mode when rendering a final mix.
Using the "S" (solo) and the "M" (mute) switches, you can
solo and mute the convolution channel, respectively.
The "Link To" selector allows you to link a convolution channel to
any other convolution channel. The Solo and Mute switches and the Quality
setting will be linked, and thus will be disabled. The Dry and Wet knobs,
instead of being absolute values, will be values relative to the values
specified in the "Link To" channel (the dB labels below these knobs will be
highlighted with a right-arrow to denote relative values in effect).
This allows you to simplify control over the linked convolution channels.
NOTE: If you think you have correctly specified
all of these parameters, but are still not hearing any sound, make sure the
chosen slot has an impulse file loaded in it and the selected input and output
channels are actually available in the current configuration. Also, check the
state of the "M" and the "S" switches.
Main controls
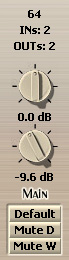
These are the main output controls.
The "Dry" (upper) and the "Wet" (lower) knobs adjust the dry
and the wet gain value of all convolution channels, respectively.
The button with the "Default" label printed on it allows you to override
the quality settings of all convolution channels. This can be useful to
quickly switch between the low and the max quality setting in all convolution
channels. In the "Default" state, quality settings would not be forced to some
particular state, but instead each convolution channel will use its own
quality setting.
The "Mute D" and "Mute W" switches allow you to switch dry
and wet signals, respectively, in all convolution channels, on and off.
Please note the three labels on top of this picture. The label with the
numeric value (64) displays the processing delay (latency) the plug-in is
currently using.
The "INs" label shows the number of inputs currently available. For
example, if there are 2 inputs currently available you can only use "IN 1" and
"IN 2" Aud In channels as a convolution channel's inputs. Pretty much the same
applies to the "OUTs" label. This label shows the number of outputs
currently available. The number of inputs and outputs currently available can
be adjusted on the global settings screen.
Impulse response controls
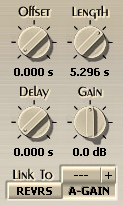
This is a set of controls which allows you to adjust the loaded impulse
response file non-destructively. It reflects the state of the impulse response
loaded in the currently selected slot.
Using the "Offset" and the "Length" knobs you can cut the
loaded impulse response file. You can monitor the effect of these knobs on
the envelope display.
The "Delay" knob adjusts the output delay of the impulse
response.
The "Gain" knob adjusts the volume of the impulse response.
The "A-Gain" (auto gain) switch enables/disables the automatic
gain function. Enabling auto gain is generally useful because it keeps the
volume of all impulses equal so you can load different impulse response
files without needing to continuously adjust the "Gain" knob. Even with
the "A-Gain" switch enabled, you can still adjust the output gain with the
"Gain" knob.
The "Revrs" (reverse) switch enables/disables the reversal of
the loaded impulse response file.
You can use the "Link To" selector to link the Offset and Delay
controls of the currently selected slot to another slot. Please note that
if these controls were linked you will have no control over them, in the
current slot. Linked slot also uses another slot's internal auto gain value.
Linking is useful when you use split-channel impulses which are loaded in
different slots.
The "+" switch additionally enables Length and Gain controls linking
when the Link To selector is used.
Envelopes
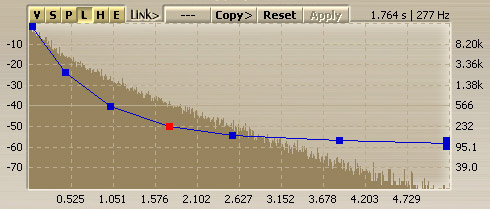
Here you can see the envelope editing part of the user interface.
It reflects the state of the impulse response loaded in the currently selected
file slot. In the center there is a wave display of the impulse response.
It displays peak values only. The envelope (blue-colored curve) is shown on the
wave display, overlayed.
The selectors with the "V", "S", "P", "L", "H" and "E" letters are the
envelope selectors. "V" stands for "Volume", "S" stands for "Stereo Width",
"P" stands for "Stereo Pan", "L" stands for "Low-Pass", "H" stands for
"High-Pass" and "E" stands for the equalizer envelope.
The scale on the left denotes the relative power of the impulse response in
dB. You can view the wave with the resolution of up to 80 dB. The meaning of
the scale on the right depends on the currently selected envelope. The scale
below the wave display shows impulse response time, defined in seconds.
When the equalizer envelope is enabled, both the left and right scales show
the equalizer gain, in dB, and the scale below the wave display shows
frequencies (logarithmic scale).
In the top right corner of the wave display, you can see the mouse position
readout.
The "Link To" selector allows you to link the currently selected
envelope of the currently selected file slot to the same envelope of another
file slot. Such linking works as a substitution. Linking can be useful if you
wish to edit the envelope in one slot without the need to duplicate your
modifications in another slot.
The "Copy" (copy to) button allows you to copy the current
envelope of the current file slot to the same envelope in another file
slot.
The "Reset" button resets the envelope.
The "Apply" button is available only if the "Auto Apply" mode
is off and the envelope has been changed. You can press this button to apply
all changes made to the envelope.
Envelope: control points
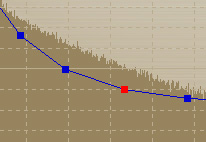
This picture shows the control points which can be dragged with the left
mouse button to adjust the current envelope. Double-clicking on a control
point removes it. The first and last points return to default vertical
position when double-clicked. To add a new control point, double-click
the control surface at the desired position.
If several points are selected and you double-click any of the
existing points, all selected points will be either deleted or reset.
Dragging the envelope line selects two points, adjacent to this line,
and enables you to move these points, vertically constrained.
Envelope: group editing of control points
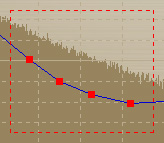
You can also edit groups of control points by selecting them in a very
convenient manner. Just hold down the left mouse button and
start dragging the control surface. In response to
your dragging, a box will appear showing the selection area. All control
points that enter this area become selected. You can then move a group of
selected points the way you would move a single point, vertically constrained.
To add points to the current selection, press the SHIFT key before
starting to drag the control surface. To deselect the currently selected
points, simply click the control surface anywhere.
You can press the right mouse button on the control surface to select all
control points.
Envelope: zooming

You can zoom in the control surface by first holding the ALT key and
then dragging the control surface. In response to this, you will see two
vertical red dashed lines specifying the zoom in area.
To fully zoom out, hold the ALT key and double-click the left mouse
button.
While the control surface is zoomed, you can scroll the
visible control surface area. To scroll this area, hold the CTRL key
and drag the control surface, and then move the mouse to the left or to the
right.
Global settings

Pressing this button will display the plug-in's info screen. This screen
shows copyright and registration information, and contains the "Help"
button which opens the bundled HTML help file you are reading now.
This screen also contains the following global settings. A global setting
is one that affects all Pristine Space instances in all audio host
applications. All settings except the "Auto Apply" take effect only after
the plug-in instance is reloaded or audio host application is restarted.
NOTE: These global settings can be considered
'advanced' settings. Please make sure you fully understand their meaning
before making any changes. Also, make sure your audio host supports the
settings you choose.
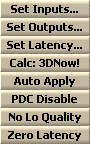
The "Set Inputs..." and the "Set Outputs..." selectors allow
you to choose the number of inputs and outputs the plug-in supports,
respectively. These numbers are reported to the audio host when the plug-in is
being initialized.
The "Set Latency..." selector shows you the list of the possible
processing delays (in samples). Bear in mind that the lower the processing
delay you select the more CPU resources the plug-in consumes. If you do not
plan to use Pristine Space for tracking it is suggested to choose latency
values of 8192 or 16384. For 96k projects you may even choose the value of
32768. NOTE: It is highly suggested to set your
audiocard block size (latency) in accordance with the latency of the plug-in.
The most suggested audiocard block size value is four times larger than the
value you choose with the "Set Latency..." selector. For example, if you
choose "64" then it is suggested to set your audiocard block size to 256
samples. For plug-in latencies above 1024 you may choose the audiocard block
size of 4096 samples.
The "Calc" selector allows you to force a specific calculation
(optimization) mode. For example, on the latest 64-bit AMD processors it may
be useful to enable SSE operation mode because by default Pristine Space uses
3DNow! optimization on AMD processors. FPU mode is the least preferred mode
for use with the latest processors, but enabling it without any efficiency
loss may tell you that your system's memory bandwidth is limited for
convolution tasks. Also note that the "Calc" button shows the mode currently
being used (e.g. "Calc: SSE"). Also note that the implemented SSE support is
compatible with SSE2 (SSE2 by itself does not add anything specific which can
be utilized by Pristine Space to bring a speed boost).
The "Auto Apply" switch is enabled by default, forcing Pristine
Space to recalculate the loaded impulse after each envelope change. You can
disable the "Auto Apply" mode to make the overall workflow go smoother, but
then you will have to press the "Apply" button manually in order to
apply any changes made to the envelope.
The "PDC Disable" (PDC means `plug-in delay compensation') option
can be used to force the plug-in to report zero latency to the host. In some
cases, on dual processor systems, this allows you to run two instances of
Pristine Space for the price of one. Some hosts (e.g. Cubase SX) do not run
plug-ins with non-zero latency on two processors in parallel. Please note that
with this setting enabled, the host will not be able to compensate for
plug-in's latency. This setting can be especially useful during tracking, on
dual processor systems and multi-processor-enabled audio hosts, with a low
latency settings (64 to 256).
The "No Lo Quality" global setting disallows the use of the Low
quality convolution mode. A convolution channel's quality setting will be
ignored and the Max quality setting used instead. Disabling the Low quality
mode this way frees up considerable amounts of system memory (about 30%, e.g.
plug-in will use 2 megabytes instead of 3 megabytes, of memory). It is
highly suggested to enable this setting if you do not plan to use the
Low quality mode at all.
The "Zero Latency" setting enables a true zero-latency processing
mode. Please note that this mode has its own limitations. It will work only
with audiocard block sizes (latencies) which are a power of 2, in between 32
and 16384 samples. For example, if the current audiocard block size is 5512
samples, Pristine Space will be silent given that the "Zero Latency" mode is
enabled. Another limitation this mode imposes is the stability of the CPU
load: you may experience CPU spikes and overloads, especially if you are
using more than two instances of Pristine Space. This mode can be useful for
tracking sessions, when you don't need many plug-in instances, but where
zero latency operation is useful.
"Latency +512" global setting
Some impulse responses (e.g. linear phase filters) have pre-ringing before
their initial spike. For the tonal balance of these impulse responses to be
preserved, the pre-ringing must be included; the drawback is that the
processed wet signal will play later than the unprocessed dry signal.
Pristine Space's "Latency +512" mode solves this problem. When this mode is
enabled a red line in the wave display indicates the time when the dry
signal plays; the impulse response can then be positioned, using the offset
control, so that the initial spike coincides with the red line. When the
offset control is set to a negative value the impulse response will shift to
the right, when it is set to a positive value it will shift to the left.
When using an impulse response which starts with an initial spike and has
no leading samples, the spike can be quickly aligned to the dry signal by
moving the offset control fully anticlockwise so that the response is
shifted by exactly 512 samples to the right. When using an impulse response
generated by Impulse Modeler with the "Add Pre silence" option enabled,
there is no need to alter the offset control from zero, because Impulse
Modeler adds 512 leading samples prior to the initial spike.
Search paths

Defining search paths can be useful when you have a situation where you
load some old project which uses impulse response file which is not available
in the original folder anymore. To resolve this situation simply assign the
path where this impulse resides now to one of the search paths and Pristine
Space will automatically locate this impulse file for you.
Search path list is available when you press the '?' button. You can
define up to three search paths. Impulse file will be also searched in
subfolders of the selected folder.
The "Browse" button allows you to select a search path.
The "X" button removes a search path.
Factory presets information
Pristine Space is bundled with seven basic template presets. These presets
should be used mainly as a starting point for your work, since they are
not linked to any particular impulse responses. These presets are:
2ch reverb insert: can be used as a general setting when
Pristine Space is used as a audio channel insert processor. You should load
the impulse response in the Slot 1.
2ch reverb send: can be used as a general setting when
Pristine Space is used as a send effect. You should load the impulse response
in the Slot 1.
Drum ambnc and ovrhds: (drum ambience and overheads) can be used
as a send effect setting for applying `advanced' drum reverb consisting of
separate ambience- and overhead-mic-captured reverb impulses. You should load
the impulse response for ambience in the Slot 1; the overhead mic impulse
should be loaded in the Slot 2.
2-step 2ch serial insert: can be used as a general setting for
serial processing, when Pristine Space is used as an insert effect, without
dry signal mix. Impulse responses should be loaded in Slots 1 and 2.
3-step 2ch serial insert: this preset is generally equal to the
previous preset setting. The only difference is that you should additionally
load the impulse response into the Slot 3.
True stereo reverb insrt: this is a general setting for processing
stereo signal with two stereo impulse responses, when Pristine Space is used
as an insert effect. Impulse responses should be loaded in Slots 1 and 2.
True stereo reverb send: same as above, but for send effect.
Troubleshooting tips and additional
information
So this plug-in is multiple input, multiple output?
Yes, it is. By default it is 2-to-2, but the number of outputs can be
changed (not in real-time, though). For example, you can set it to use 8-to-8
configuration and then use input/output channels you actually want to use.
A slight overhead on the unused channels won't hurt too much.
Is the stereo width indeed time-dependent? If you apply a descending
line or curve, will the wet sound become more centered as the reverberation
fades out?
Stereo width works exactly the way you have described.
Are the cutoff frequencies for the filters variable over the time of the
impulse? That is what it looks like to me. So, if I set a straight line
high-pass at 260 Hz, the entire impulse is just passed through a filter with a
260Hz cutoff. What is the slope of the filter?
Yes, the filters are time-varying. If you make a straight horizontal line
on the envelope plot then the cutoff frequency will be static. Steepness is
-12dB/oct for both low- and high-pass filters.
If I drop the stereo line width to zero, the wet sound becomes more
centered but it still stereo. Is that correct?
You are not getting a narrower field because your input signal is still
in stereo. Stereo width of impulse does not affect stereo width of the input
signal.
Could you please explain True Stereo in a bit more depth?
The concept of `true stereo reverb' is very simple. Chances are, in most
cases, you are using a single stereo reverb impulse file with a stereo
input, meaning that each input channel is processed with a single channel of
the impulse file. This concept works well with non-panned mono signals.
But if you wish to pan the input, such an approach gives unsatisfying results:
the output signal will be also panned, but its reverb structure will remain
the same. This, of course, does not sound nice at all, especially when
mixing several panned sources. To overcome this problem, so-called `true
stereo' processing can be used. But for this to work, you should use two
stereo reverb impulses and four convolution channels routed to two
outputs.
Could you use multi-impulses to simulate overhead mics and ambience mics
for acoustic drums?
Of course--you can use several convolution channels and impulses to
mix ambience and overhead mics, having only a single stereo input. This is one
of the most useful features of a multi-channel convolution plug-in.
You can use the factory template preset Drum ambnc and ovrhds as
a starting point.
Is there any way to make Pristine Space more CPU efficient?
Pristine Space is maximally efficient at 16384 and 32768 sample latencies
only. 64 sample latency requires much additional CPU resources, despite that
Pristine Space is *very* optimized for such low latency. It is highly
unlikely that it is possible to get any additional CPU efficiency without
quality reduction or added latency. Since Pristine Space supports SSE and
3DNow! optimizations, you may look forward to the newer generations of the
PC processors. SSE and 3DNow!, which are implemented in today's processors,
do not offer any serious additional performance increase to convolution, but
these technologies can be optimized in future processors, bringing a high
speed boost to convolution computations.
Can I use the multi-input/output capabilities of Pristine Space in Logic
Audio?
This may not be possible. Some testing revealed that Logic Audio does not
allow the use of multi-input plug-ins, limiting them to two inputs, only.
This means, in Logic Audio, you can only use Pristine Space in the two
inputs/two outputs configuration.
In your help file you mention that we can use two stereo reverb impulses
and four convolution channels routed to two outputs. Are those stereo reverb
must be one left and one right files or only the same stereo file loaded in
the slots?
They should not be necessarily the same files. It is better to have two
'real' files. However, if your files are same, it is practically the same as
using one stereo impulse over mono input (left+right sum).
I'm unclear on what exactly I should do with the presets when setting up
Pristine Space on a stereo bus as an effects send. I want to setup a stereo
reverb send correctly and get the most out of PS. Which preset should I be
using and how exactly should I load the impulses?
You should use '2ch stereo send' preset with one stereo impulse file loaded
into slot 1.
I wonder: most busses in DAWs are at least 32 bit. Do 32 bit IRs
(impulse responses) take more CPU-power? Or is Pristine Space working in
32 bit float anyway and is the CPU-load the same as for 24 bit IRs?
32-bit IRs are not more CPU intensive. In fact, all IRs you load in
Pristine Space are first converted to 32-bit floating point.
I may be a little naive here but I am finding it impossible to line up a
dry and wet signal in Pristine Space. I want to use PS on a master out channel
to apply compression to a stereo master, but need to mix the wet and dry
signals without phasing out the two signals.
I think this won't be possible in almost any case, because 'compressor'
impulses usually have a lot of phase delays that are introduced by A/D
conversion and the compressor device itself. You may apply various 'hardware'
impulses in 100% wet mode only. Otherwise it is hard to line them up, even if
you are doing it manually, shifting by 1 sample. And just for your
information, it is impossible to compressor nor limit signal by using
impulses. 'Hardware' impulses can only be used for equalizing and applying
phase coloration. Dynamics is out of reach of standard impulses.
I have been comparing P.S. to other impulse VSTs and it sounds
different...better. I know you have trade secrets but does P.S. handle the
files different?
No, files are not handled 'differently'. Convolution is known for its
intense calculation nature, and is prone to a quick precision degradation.
All I did is tried to retain precision. Pristine Space is in fact a 'bread and
butter' convolution processor - you can use it for a lot of tasks beside
applying reverbs: for example, it can be also used to conveniently decode
WXY surround files.
On multi processor systems is PS optimized to make use of more than one
processor?
Pristine Space does not have special multi-processor optimizations, but it
works fine if audio host application puts two or more instances on several
cores/processors. This means that a single instance of Pristine Space won't
be spread over two cores/processors, but if you load two instances, they will
be spread. I've tested this in Cakewalk Sonar 5, for example, and the boost
is around 70% in comparison to single-core mode (and having two Pristine
Space instances are running).
Is there some sort of standard format for the IR files?
There is no 'standard' for IR files. IR files are usually stored as WAV
files, and can be edited and manipulated in any sound editor. Pristine Space
will load any IR file stored as WAV file.
What happens if I am working on a project @ 96Khz and I wish to use a
reverb impulse sampled at only 44.1Khz? Is there a quality loss?
Artifacts?
Pristine Space resamples automatically. Of course, its resampler's quality
is not as good as r8brain PRO, but in average the quality is OK. You should be
using an external sample rate converter for best results.
Happy Musicmaking!