Introduction
Recently, sampling (convolution) reverbs have become more and more in
demand. With convolution, we have an opportunity to capture the sound of
anything in the world that can generate a reverb and use these sound impulses
freely in any situation imaginable. This enables us to use the sound of
high-end reverb units, real-world rooms, halls, cathedrals, synthetic reverbs
and other sources, including non-reverb ones, without any hassle and in a
uniform way using only a single program or a plug-in module.
Although there are many different sources of impulse responses, we also
face the difficulties of acquiring these so they can be used seamlessly in any
software environment.
In many cases during some stage of the impulse capture, we typically have
a rather large set of recorded test tones that were run through some device or
mic'ed in some room. This poses the difficulty of recovering the impulses
conveniently and with minimal user effort. The other problem we may face is
the input or the output bit-depth incompatibility of the recorded and the
recovered files. Some convolution plug-ins tend to support only a small subset
of available bit-depths. And alike, existing deconvolution programs and
plug-ins support only the given sample rates and bit depths, and tend to offer
a very poor quality deconvolution.
Voxengo Deconvolver overcomes these problems. First of all, it supports
almost all sample formats (bit-depths) of uncompressed mono/stereo WAV files.
Secondly, it offers a very convenient environment in which to deconvolve large
sets of recorded files. Voxengo Deconvolver also offers a true mathematical
FFT deconvolution which delivers 100% exact deconvolution. At the same time,
this puts a huge demand on the system memory: deconvolving a 25-second stereo
file at 96 kHz may require up to 100 MB of memory.
Voxengo Deconvolver features:
True FFT deconvolution
Reversed test tone deconvolution technique
Minimum-phase transform option
Reads 8, 16, 24, 32, 64 bit PCM and IEEE WAV files
Writes 8, 16, 24 PCM and 32 IEEE WAV files
Multi-channel file support
Batch support
Built-in DC removal filter
Built-in test tone generator
Automatic stereo normalization
64-bit processing
All sample rates supported
Impulse capture method
Basically, there are only three things necessary to perform the capture of
almost any impulse sound source, including rooms and hardware reverb
units.
1. The ability to playback the test tone through or within the impulse
source. Making the room or field recording, you will need a speaker
connected to a playback audiocard or a CD player to perform the playback of
the test tone. When capturing a hardware unit, you will need to connect the
hardware unit's inputs directly to a playback audiocard or a CD player.
2. The ability to record the test tones which have passed through or
within the impulse source. Again, making the room or field recordings, you
will need a microphone connected to a recording audiocard or a field recording
system. When capturing a hardware unit, its outputs should be connected
directly to a recording audiocard or a field recording system.
3. The ability to perform deconvolution of the recorded test tone.
For deconvolution to work, you should record the full test tone duration
without any cutouts. For reverberant impulse sources, you should record
additional silence which should be at least as long as the expected reverb
tail. When capturing hardware units additional silence should also be recorded
as unit's impulse response can be lengthy. The recorded test tone should not
be distorted or overloaded/clipped. You should pay attention to the playback
and recording devices you use. They should exhibit a maximally linear and flat
frequency response, and should have a good signal-to-noise ratio. Another
possible requirement is that both playback and recording devices should be
wordclock-synchronized.
Nothing more should be done--other than the above-mentioned things--to
create an impulse response. Later, after performing the deconvolution, you may
need to edit the resulting impulses to fit your needs. For example, you may
need to cut the leading and/or trailing silence. Also, you may need to add
fade-ins and/or fade-outs. Voxengo Deconvolver does not require the recording
to be "in sync" with the test tone - you may add as much pre- and post-silence
as you need.
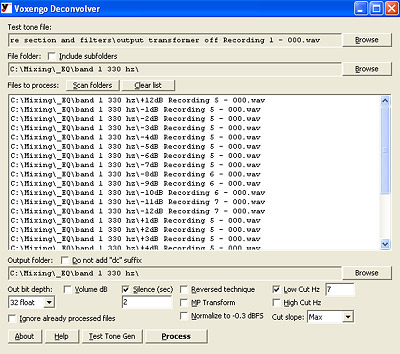
Explanations on the GUI
Test Tone File. Here you can specify any WAV file that contains
the test tone used during capture. This can be a mono or stereo file with any
sample rate.
File Folder. This is the name of the folder containing the
plain (non-deconvolved) recorded impulses. To select a folder, just select any
file in it. In parallel, deconvolver will put the selected file into the file
list which you can immediately process without first pressing the "Scan
folders" button.
Files to process list box lists all the files which shall be
processed when you press the "Process" (or the "Invert") button. You can use
the Del key to remove list entries. Several files can be selected for
deletion. The Enter key (or mouse double click) can be used to open the
currently selected file.
Scan folders button scans the specified folder for WAV files and
adds them into the file list. Before scanning starts, the file list is
cleared. You can also use the "Clear list" button to clear the file
list manually.
Out bit depth selects which bit-depth resulting deconvolved
impulses will have.
Volume dB specifies the gain which should be applied to the output
impulse file.
Silence (sec) selects amount of the silence added before the start
and after the end of the recorded file. Generally, this must be 0, but in some
cases you might want to change this to any other value.
Reversed technique switch enables an alternative method of
performing deconvolution. This method works only for responses captured using
sine sweep test tones created with Voxengo Deconvolver. Responses captured
with other types of test tones may not work at all. This mode in some cases
gives deconvolution of a better quality compared to a standard deconvolution
method Voxengo Deconvolver uses. This is especially true with low
signal-to-noise (SNR) ratio recordings such as room and field recordings.
This is also true for hardware units with a limited frequency bandwidth and
SNR. Please note that test tones created with fade-in and fade-out
work best with the reversed test tone technique.
MP Transform enables minimum-phase transform that takes
place after deconvolution. Sometimes when you capture a non-linear equipment
like speakers and amplifiers enabling MP transform will create much more
realistic impulses, without pre-echo. This option can be also used with
reverbs. In the end, you will get a perfectly timed reverb with zero initial
delay and without pre-echo. However, this is not suitable if the left and
right channels of the reverb impulse have different initial spike timings.
Normalize to -0.3 dBFS switch enables automatic normalization of
created impulses to -0.3 dBFS level.
Low Cut, High Cut options allow you to apply low- and
high-pass filters of the specified slope to the resulting impulse file.
About button brings program's version and registration
information.
Test Tone Gen button brings test tone generator's dialog box.
Process button starts processing of the files listed in the file
list. Any file that could not be processed will be listed again after the
batch finishes. This allows you to check/edit any such file in the default
WAV file editor and continue the batch processing later.
Output folder specifies the folder where output files should be
created. This field is filled automatically after each new input file
folder is selected. Please note that if you have enabled the "Include
subfolders" option files in these subfolders will all be exported to
the Output folder preserving the folder structure.
Do not add "dc" suffix switch suppresses appending of the "dc"
suffix to the output filename. Please note that this may overwrite the
original file. Use this option with care!
Ignore already processed files switch enables skipping of
already processed files. Such files are identified by Deconvolver via special
marker which is created for each output file which passes processing
stage.
In most cases Deconvolver creates empty WAV files because the captured
impulse file's tail is too short after the test tone stops playing. Make sure
you record enough silence after the test tone ends. Ideally, the duration of
this trailing silence should be 1.5 to 2 times more the expected reverb tail's
length. For a pre-amp or other hardware unit you may additionally record
at least 1 second silence.
I guess you are trying to capture IR from the source which is not suitable
for capturing. Convolution (and hence Deconvolver) cannot work with 'tube' or
alike sound sources. It only captures EQ and phase coloration. Tube distortion
leads to a wrong impulse capture results.
Answer depends on the audio device 'quality'. If it's good quality (low
noise, good frequency response) 3 seconds should be enough - if it's a spring
reverb, for example, you should use a longer test tone. I personally tend to
use 6 second test tones.
You may mix 24-bits and 16-bits in any proportion. The end result will have
the lowest bit resolution in the chain. For example, if audio device you are
capturing is 8 bit, your final impulse will be 8 bit, too.
Normalization is useful for editing the impulse manually (adding fades,
cutting). Normalization should not be applied when you are building an array
of impulses, because otherwise gain level differences between the impulses
will be lost.
It does matter whether you playback at the high volume or at the low
volume. It's better to play at the highest volume to preserve bit depth. At
the same time, some tests revealed that by using a longer sine sweep bit depth
is preserved as well. It sounds pretty unbelievable, but it is possible to
recover 16-bit impulse using a 8-bit soundcard just by using a suitably long
test tone (however, the quality improvement is not huge considering you'll
have to use a much longer test tone).